

This week has been Dr. Seuss week at my oldest's school. It started off with "Green Day," where you wear something green to celebrate The Lorax and Green Eggs and Ham. Next up was "Crazy Socks Day" for Fox in Socks. Then there was "Read a T-Shirt Day" to encourage reading. It will close up with "Drop Everything and Read Day," which they allow the kids to wear pajamas for.
Today, was "Who-Ville Hair Day" for crazy hairstyles! I think I work best under pressure because honestly I forgot all about it until...ohhhhh, about an hour before my girls' bedtime last night. Typical. So we brainstormed some ideas, hopped online and did a Swagbucks image search (gotta get those Swagbucks! I earned $50 in Amazon gift cards this month, woohoo!). We found a few cute ideas and incorporated them with our own.
To start, I had the kids check each of the bathrooms to find out which one had the least amount of paper on the roll, haha. Luckily, we had one that was >thisclose< to being out. Neatly unrolled the last little bit and set it aside so we could have the cardboard roll.

We covered it with white construction paper and then taped a few red stripes on.
Then I took a paper plate and traced a circle. I used a pint paint can for my circle, and it was the perfect size, I think, but use what ya got. I chose to use a paper plate so it would be a little more sturdy.

I traced the cardboard tube in the middle of my new circle, and then poked a hole in the middle of that. Use the hole I poked to cut out the smaller circle without bending the plate. We picked a birthday plate and just left the "right side up" visible for the underside of the hat. :)

Then, we simply used small bits of tape to tape the hat together. The whole hat only took a few minutes. Very easy, and didn't cost me a thing since we used what we had.

Next, we took some colored straws we had on hand, and after debating (on using Sharpies to make the stripes) we just twisted green pipe cleaners around them. My little ones helped with this and loved it. It doesn't have to be perfect at all. We cut the straws to be different lengths, as well to give it some more visual oomph. :)

Then we glued pom poms to the top. The pipe cleaner was nice for this part because it gave the glue/pom pom a little more surface to stick to. Et voila! Truffula trees! We stuck them in the top of the hat. I was wishing I had some maribou (?) feathers for the tops, but, when it's 8pm the night before, you use what you have. :)

Then, we made fun little hair pins to stick all over! I don't have any ink in my printer right now, so I had to free hand everything. I don't think it turned out too bad, I just used some pictures for reference.

We got the pictures how we wanted them and just taped a bobby pin to the back. Super easy, quick, and CHEAP! Just paper, tape, and bobby pins.

As an afterthought, we used some packing tape to "laminate" them. I'd already taped the bobby pins on at that point, but I really recommend taping the front/back with the packing tape before you put the bobby pins on, as it would have been MUCH easier to cut them out that way. Live and learn. :)
I couldn't take the uneven number of pins here, so after I took that picture, I made a little Sam-I-Am pin too. I would have made a few more from other books, but my hand was cramping from the drawing and cutting. If you have a printer (with ink!), I'd totally recommend just doing an image search for what you want and printing it out.

So, for the finished product! I sectioned her hair into three parts. The top, and the sides. At the top, I braided her hair, folded it over, and put a bunch of hair ties on it so that the hat would just slip right over it and stay somewhat secure. I did attach two bobby pins in the back to keep it from wobbling around. I used some white nail polish to paint the tops of the bobby pins so they'd blend in with the hat.
Then we put the other two sections into pigtails and braided them. Super easy. If you wanted to be a little more wacky, you could do two different types of braids, or only braid one side, etc.

Then we added the pins. Would you like Green Eggs, and Ham?
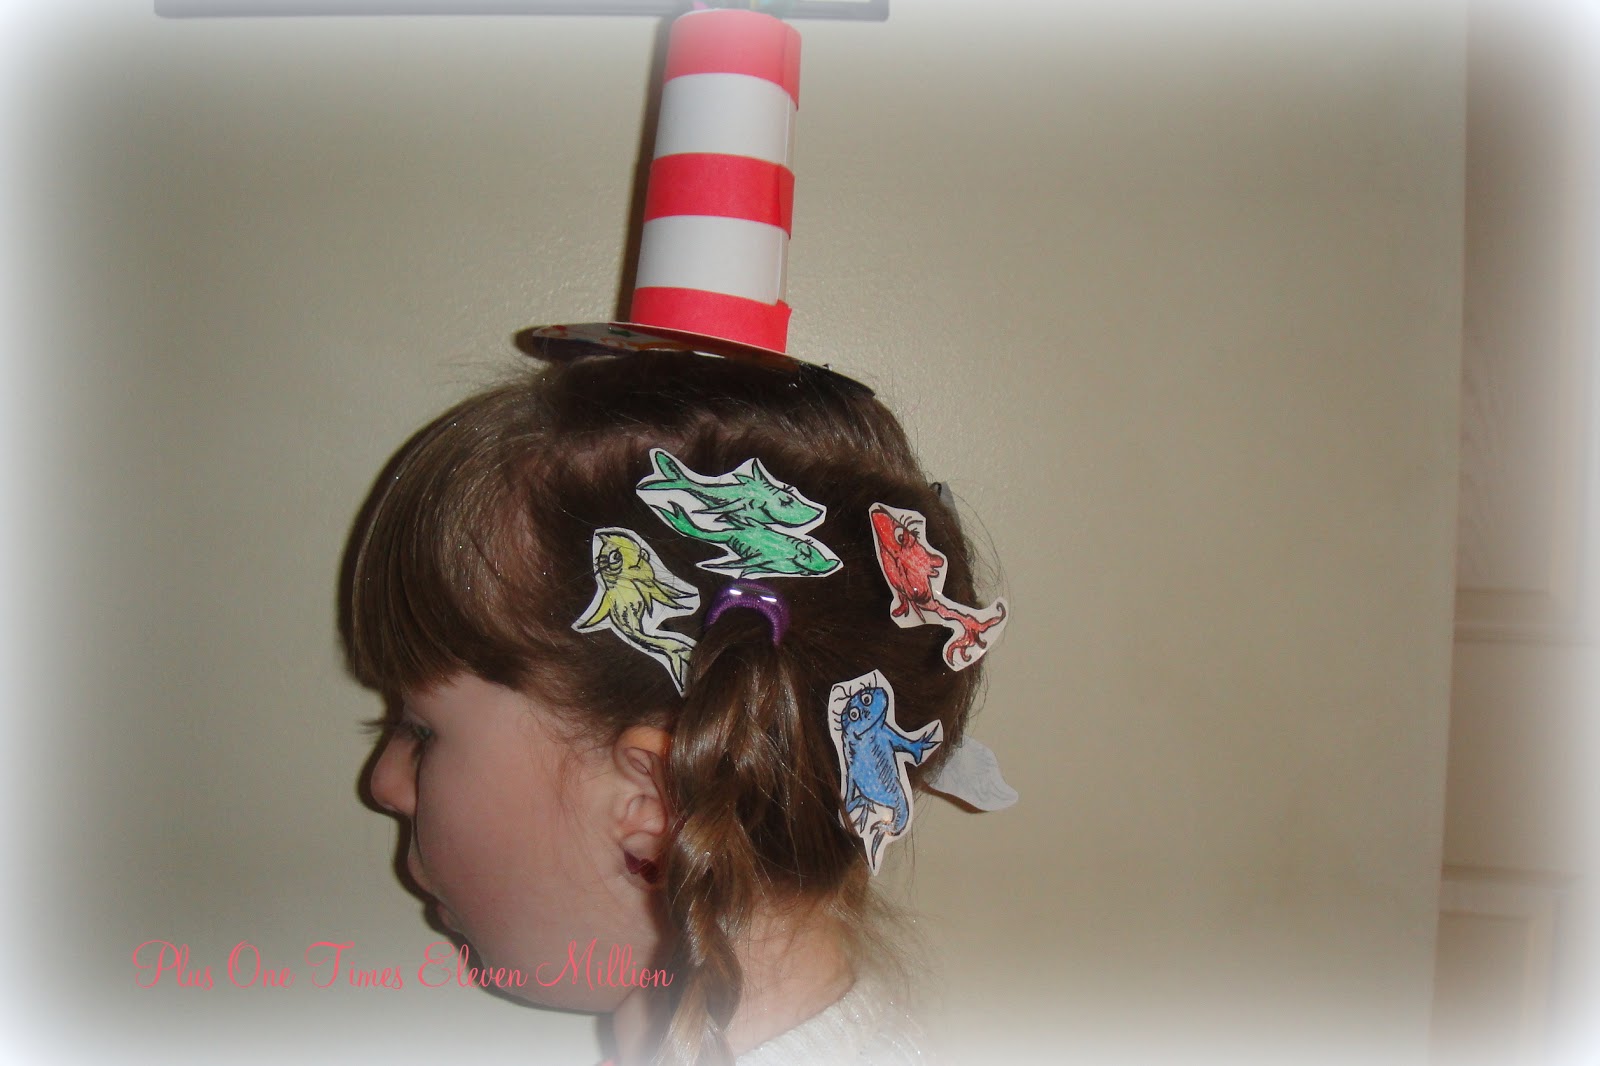
One Fish, Two Fish, Red Fish, Blue Fish!

To finish it off, we gave it a spritz of glitter hair spray (which is SO handy to have around!) and then we put some ribbon around the tops of the braids. Mostly because we didn't like the purple hair ties we used up there, haha...but it definitely added to the crazy!

What do ya think? My little one LOVED it! She was so excited to wear her crazy Dr. Seuss hair to school today.
And of course, her little sister couldn't be left out of all the fun just because she's not in school yet, so we had to come up with a little something for her too. :)

For her hair, we saw a picture on Pinterest with a little girl's hair done up into cupcakes! She fell in love with and asked if we could do that, so I said sure, why not! They had used bulliten board border for the liners, but I don't have any of that fun stuff handy, so we just used actual cupcake liners. We used five stuck together to make it thick enough to stand up. I could have used a few more, but five worked.
I poked a hole through the middle and cut out a circle (not an even one, ha!) for her hair to go through. Then we made little cherries for the top the same way we made the Dr. Seuss clips, but we made a front and a back for these since they'd be sticking out of the top and both sides would be visible.

We simply put her hair into high pigtails, and then I twisted her hair until I could pull it through the holes. Then we just bobby pinned her hair into messy buns inside the liners to make the "frosting." The design we had seen on Pinterest had colored hair spray, but I didn't have any on hand so we just didn't use it. I think I'll have to pick some up though! :) I thought about using chalk or even loose eye shadow to color the tops, but for just going to the bus stop, that was a step I opted not to bother with.
If we do this again, I think I'll curl the hair after I put it through the liners. I think it would hold better and tame some of those flyaways.

We used glitter spray on her hair as well, and she was SO proud walking to the bus stop this morning with crazy hair just like all the big kids.

For more crazy hair day ideas, check out our linky! Feel free to submit your own ideas, I'd love to see them.
Find more great Dr. Seuss ideas and activities!


You are soooo creative, and they are so cute!
ReplyDeleteThank ya! :)
Delete